Set up Port Address Translation (PAT) in the Cisco IOS
by David Davis CCIE, MCSE+I, SCSA
(May 2007)
Takeaway: NAT is a valuable tool for admins, both for conserving public IP addresses and securing internal resources. Several variations of NAT are available, including its cousin PAT. See the differences and learn how to set up PAT using the Cisco IOS.(May 2007)
* Set up NAT using the Cisco IOS
* Configure static NAT for inbound connections
* Learn to configure Cisco IOS NAT on a stick
* Using NAT to connect Windows 2003 to the Internet
* Configure IT Quick: Configuring Routing and Remote Access on your Windows 2000 server
Port Address Translation (PAT) is a special kind of Network Address Translation (NAT). It can provide an excellent solution for a company that has multiple systems that need to access the Internet but that has only a few public IP addresses. Let's take a look at the distinctions between NAT and PAT and see how they are typically used. Then, I'll show you how to configure PAT on a Cisco router.
Understanding PAT and NAT
Before discussing PAT, it will help to describe what NAT does in general. NAT was designed to be a solution to the lack of public IP addresses available on the Internet. The basic concept of NAT is that it allows inside/internal hosts to use the private address spaces (10/8, 172.16/12, and 192.168/16 networks—see RFC1918), go through the internal interface of a router running NAT, and then have the internal addresses translated to the router's public IP address on the external interface that connects to the Internet.
If you dig into NAT a little deeper, you will discover that there are really three ways to configure it. From these configurations, you can perform a variety of functions. The three configurations are:
PAT
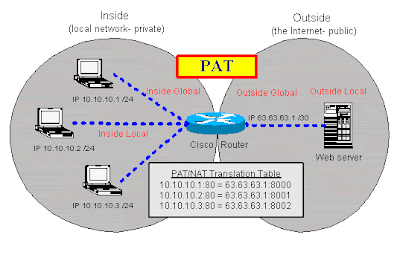
PAT is commonly known as “NAT overload” (or sometimes just “overload”). In this configuration, you have multiple clients on your inside network wanting to access an outside network (usually the Internet). You have few public IP addresses, many more than the number of clients, so you have to “overload” that real Internet IP address. In other words, you are mapping many inside clients to a single Internet IP address (many to one). For an illustration of PAT, see Figure A.
Figure A

Pooled NAT
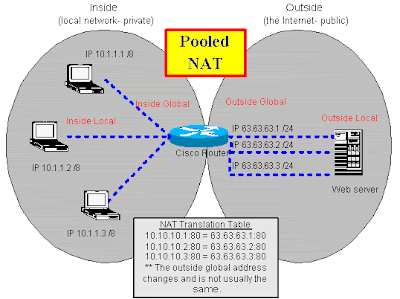
Pooled NAT is similar to PAT except you have the luxury of having a one-to-one mapping of addresses. In other words, you have just as many inside network clients as you do outside network IP addresses. You tell the NAT router the pool of IP addresses that are available, and each client receives its own IP addresses when it requests a NAT translation. The client does not get the same address each time it requests a translation; it merely gets the next available address from the pool. In my article "Set up NAT using the Cisco IOS," I explain how to configure Pooled NAT. For an illustration of Pooled NAT, see Figure B.
Figure B

Static NAT
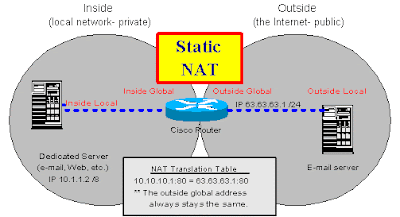
Static NAT is the simplest form of NAT. The most likely example is a mail server on the inside of a private network. The private network connects to the public Internet. In between the two networks, a router performs NAT. For a dedicated server, like a mail server, you would want a static (not changing) IP address. This way, every time someone on the Internet sends e-mail to the mail server, that server has the same public IP address. For an illustration of Static NAT, see Figure C.
Figure C

As I said, you can perform a variety of functions with these three configurations. For the purpose of this article, we will focus on configuring PAT.
Configuring PAT
To configure PAT/NAT correctly the first time, you need to understand the Cisco NAT terminology and how your IP networks/addresses map to each of the entities listed below:
* Inside Local—This is the local IP address of a private host on your network (e.g., a workstation's IP address).
* Inside Global—This is the public IP address that the outside network sees as the IP address of your local host.
* Outside Local—This is the local IP address from the private network, which your local host sees as the IP address of the remote host.
* Outside Global—This is the public IP address of the remote host (e.g., the IP address of the remote Web server that a workstation is connecting to).
You'll configure your Cisco router using seven commands. Let's assume that your Internet service provider gave you a 30-bit network containing two public IP addresses. This configuration would allow one address for your router and one address for your internal clients and devices. The first command you'll execute will tell the router which public IP address you want to use for PAT:
ip nat pool mypool 63.63.63.2 63.63.63.2 prefix 30
This command configures a pool (range) of IP addresses to use for your translation. In this case, we want only one address in our pool, which we will overload. We do this by assigning the same IP address (63.63.63.2) for the start and end of the pool.
The next command will tell your router which IP addresses it is allowed to translate:
access-list 1 permit 10.10.10.0 0.0.0.255
It's not a good idea to put “permit any” in the access list, even though you will occasionally see that as a recommendation in some sample configurations.
The next command is:
ip nat inside source list 1 pool mypool overload
This command puts the pool definition and the access list together. In other words, it tells the router what will be translated to what. The overload keyword turns this into a PAT configuration. If you left out overload, you would be able to translate only one IP address at a time, so only one client could use the Internet at a time.
Next, you need to tell PAT/NAT what interfaces are the inside network and what interfaces are the outside network. Here's an example:
interface ethernet 0
ip nat inside
interface serial 0
ip nat outside
With these commands, your PAT configuration is finished. You have told the Cisco IOS you are translating your network A into a single IP address from network B, that network A is on the ethernet 0 interface and network B is on the serial 0 interface, and that you want to allow the inside network to overload the single IP address on the outside network.
Finally, verify that NAT works. This can be as simple as doing a ping command from your inside local host to an outside global host. If the ping succeeds, chances are you have everything configured correctly. You can also use the following Cisco IOS commands to confirm and troubleshoot:
show ip nat translations [verbose]
show ip nat statistics
With the translations command, you should see the translation that was created from your ping test. But watch out: The translations will disappear after their time-out expires. If you have configured overload, these time-outs are configurable by traffic type.
Summary
You should now understand the differences between PAT, Pooled NAT, and Static NAT, and you should be able to do a basic PAT configuration with the Cisco IOS. For more information, check out the links below.
source : www.techrepublic.com


You have Outside Local and Global backwards!
ReplyDeleteHiding internal/Private source IP behind a public IP:
Inside-Local(Src) --> Inside-Global(Dst) -->[NAT-GW]--> Outside-Local(Src) --> Outside-Global(Dst)
Targeting a public destination VIP and static NATting it to the real Internal (private) host IP:
Inside-Local(Dst) <-- Inside-Global(Src) <--[NAT-GW]<-- Outside-Local(Dst) <-- Outside-Global(Src)
Cisco reference:
https://www.cisco.com/c/en/us/support/docs/ip/network-address-translation-nat/4606-8.html?referring_site=bodynav
This comment has been removed by the author.
ReplyDeleteMy apologies...(this is proof of how confusing Cisco's stupid NAT terminology is!)...correcting myself, THIS is how it should be:
ReplyDelete"Global" = the 'outside' network (public internet)
"Local" = the 'inside' network
Hiding internal/Private source IP behind a public IP:
Inside-Local(Src) --> Outside-Local(Dst) -->[NAT-GW]--> Inside-Global(Src) --> Outside-Global(Dst)
Targeting a public destination VIP and static NATting it to the real Internal (private) host IP:
Inside-Local(Dst) <-- Outside-Local(Src) <--[NAT-GW]<-- Inside-Global(Dst) <-- Outside-Global(Src)